Cleaning Tuna How to Guide
Learn how to clean tuna like a pro with our guide. From gutting to filleting, discover the best tips, tools, and step by step techniques to make your tuna prep easy and efficient.
Cleaning a fish seems like a daunting task if you’ve never done it before. But it is a essential skill to learn for when you start catching tuna.
Properly cleaning tuna is key to preserving its flavor and texture. When done correctly it prevents contamination and ensures the meat stays fresh longer. If the fish isn’t cleaned correctly, leftover blood, guts, and scales can degrade the quality leaving you with an off taste or tougher cuts. Or worse, you could create a foodborne illness.
Being able to clean the fish properly will also ensure you don’t waste any of the tasty meat. We will guide you through both the gutting and filleting methods.
Cleaning Tuna a Sharp Knife is Needed
The most important tool needed to clean tuna is a good sharp knife. Having a sharp knife will ensure you can cut the tough skin and bones of the fish.
Using a sturdy, non slip cutting board is also benificial when cleaning tuna. Ideally you want a surface big enough to accommodate the fish and ensure it’s made of material that is easy to clean such as plastic or bamboo.
Try to wear cut resistant gloves when cleaning tuna to protect your hands from sharp knives and the fish’s fins. These gloves give you better grip and control, making the process safer and easier.
A sharp knife is your best friend when cleaning tuna. After each use, clean your knives with warm soapy water and dry them thoroughly. Dont forget to sharpen them regularly to maintain precision cuts. Dull knives make the process harder and increase the risk of injury.
Cleaning Tuna Tips
Read these cleaning tuna tips before starting. Then, they will be fresh in your mind when you perform the process.
Cleaning Tuna Common Mistakes to Avoid
One common mistake is cutting too deep while gutting, which can puncture the stomach and contaminate the fish with bile. Make shallow and controlled cuts to avoid damaging the meat.
Not removing all the bloodline. The bloodline runs along the center of the tuna fillet, and if it’s not removed, it can give the fish a strong, metallic taste. Removing it ensures a cleaner flavor and better presentation.
Over filleting can result in wasting valuable meat, while under filleting leaves tough sections attached to the bones. Follow the natural contours of the fish for the perfect cut every time. It does take practice.
How to Fillet Fresh Tuna
Stay tuned for more tips and tricks on How To Catch Tuna.
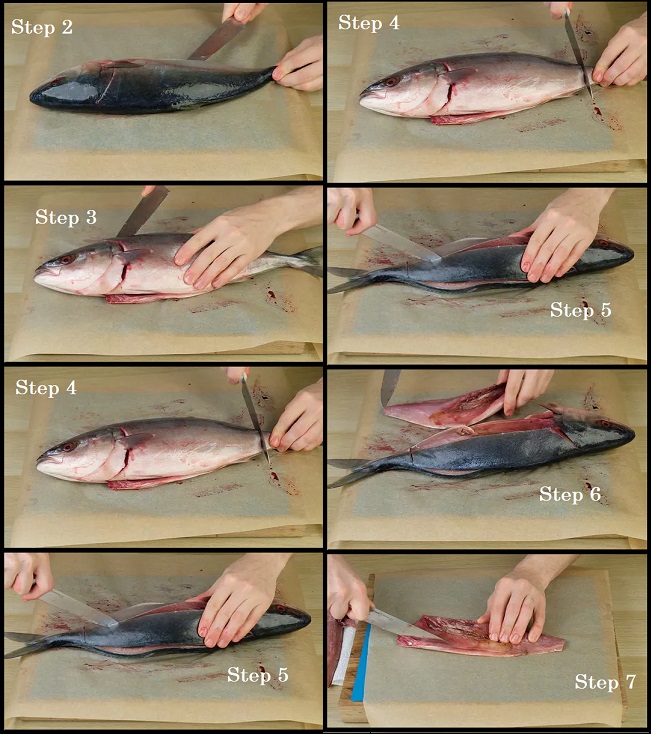
Filleting a fish is the easiest way to prepare and store it. The method we will introduce is known as quartering. Picture below.
Step 1 – Prepare an area for filleting the Tuna.
- Start with a hard clean surface. A cutting board is perfect, but the ground or boat floor may have to suffice. You are welcome to put down paper to help keep the fish cleaner.
- Lay the fish horizontally on the cutting board with the belly facing you. Make sure there is enough room to easily move your arms and knife around the fish. Also ensure you can flip the fish over with ease.
Step 2 – Cut the head and belly of the Tuna
- Put your knife under the pectoral fin and cut on a downward 45 degree angle towards the head. Stop cutting once you hit the spine.
- Insert your knife into the belly. you want the tip of the knife go as far into the fish as its pectoral fin.
- Keep your knife parallel to the cutting board, cut along from the head to the tail maintaining the depth of the pectoral fin.
- You are aiming to separate the meaty sides from the bony ribs of the fish.
- Be careful of your non cutting hand, aways make sure its safe from the knife’s edge.
Step 3 – Cut the top of the Tuna
- Flip the fish over so that the top is now facing you and the belly is facing away.
- Inset the knife into the top behind the head. you want the tip of the knife to go as far into the fish as the pectoral fin. you will feel the resistance ease as you find the spot you cut in the previous step.
- Keep your knife parallel to the cutting board, cut along from the head to the tail maintaining the depth of the pectoral fin. You are aiming to separate the meaty sides from the spine of the fish.
- A sharp knife will ensure clean cuts, avoid sawing motions.
Step 4 – Cut the tail of the Tuna
- As far down on the tail as practically possible, take your knife and cut in a downwards motion. Stop when you hit bone.
- Flip the fish over and repeat the tail cut on the other side.
Step 5 – Quartering the fillets
- Using either the dorsal fin or lateral line of the tuna as a guide, insert the knife into the tuna can cut from head to tail . Essentially separating the tuna’s meaty side in half.
- Flip over the tuna and repeat the process.
Step 6 – Removing the meat from the tuna body
You will now have your tuna fillets cut into roughly four even pourtions (2 on each side). It’s now time to detach them from the carcass.
- Carefully use your knife to slice around each quadrant of meat, separating the meat from all the bones and rest of the fish’s body.
- Do this on both sides until you are left with 4 pieces of tuna flesh and the carcass.
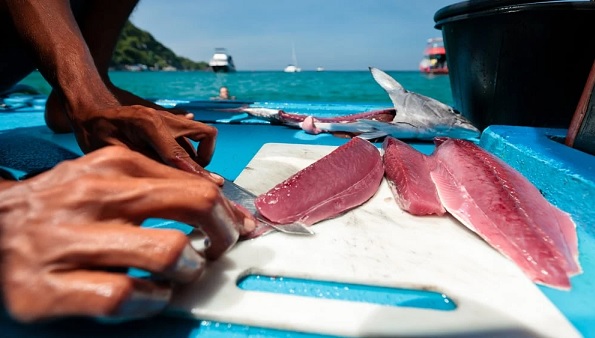
Step 7 – Cleaning the tuna fillets
Its more than likely you will be left with four pieces of meat but there is bones, fat, blood vessels, organ matter on the fillets. It’s time to cut them off.
- Using your knife, cut away any opaque, fatty, bony matter from each of the four fillets.
- Cut away any bloodlines which are very dark red lines that run along the length of the meat.
Once done with cleaning the tuna, disinfect your workstation with soap and hot water. Wipe it down thoroughly with hot water and/or cloths. If you are using a cutting board, wipe down all the sides and bottom of it too.
Step 8 – How to Skin Tuna Fillets (optional)
- Place the fillet skin down on your cutting board, orentiting it tail end towards you, head end away from you.
- Holding the tip of the tail end between your thumb and index finger, make a light downward cut into the flesh down to the skin. IMPORTANT – Do not cut the skin.
- Whist still holding the tip of the tail with your thumb and index fingers, angle the knife on a 20-30 degree angle away from you.
- Wiggle the knife while both pulling the fish towards you and sliding the knife away from you to effectively slicing the skin away from the flesh.
How to Gut Fresh Tuna
The aim when ‘gutting a tuna’, is to remove the fishes insides. This is done so that the fish can be stored without spoiling the meat. Some people like to remove the head, some like to leave the head on, its up to you.
Step 1 – Cut the Tuna’s Belly
With a sharp knife, make a incision into the Tuna’s anus. You will need to cut 1-2 inches deep until the top of your knife is in the belly crevice. Slide the knife towards the head stopping where the gills meet.
Step 2 – Remove the guts and organs of the Tuna
Once the opening is created, pull out the unwanted organs from the Tunas belly, it is important to get them all.
Step 3 – Scrape clean the Tuna’s Belly
Use the knife or a wire brush to scrape any blood lines, hard to detach organs and stomach lining away from the fish.

Tuna Carcass what to do with it?
There are many uses for the tuna carcass. We would encourage a sustainable earth, so try to use any of these methods as opposed to throwing it in the bin.
- Cut chunks off the carcass, and use them as fish bait.
- Cut chunks of the fish as smaller parts of flesh can be kept for sushi
- Use the carcass for shark fishing, sharks will smell it from miles away.
- Cut the carcass into smaller parts and give it to your pet.
- Leave the carcass in a secluded spot for birds or other animals to eat
- DO NOT discard at boat ramps, popular fishing spots or locations.
How to Store Fresh Tuna
If you have just caught fish, it can be put on ice or in cool water slush. You have only 1-2 hours before it will spoil.
After you have cleaned the fish in either method, it’s important not to let the fish touch ice, it will tarnish the flesh. Ensure the fish is in a bag or container and kept cool or frozen until you are ready to cook it.
If you plan to use your tuna within a few days refrigeration is fine, but freezing is best for keeping the meat fresh over weeks or months.
Use fresh tuna within 2 days, or store it in the freezer for 3 months.
Cleaning tuna might seem like a daunting task at first, but with the right techniques and tools, it’s a straightforward process. A little practice is also essential. By following these steps you will ensure that your tuna is prepared perfectly every time. Whether for grilling, sushi, or storing for later.
Semantic Keywords:
- How to clean tuna
- Tuna cleaning techniques
- Best knives for cleaning tuna
- Filleting tuna
- Gutting tuna tips
- Tuna preparation guide
- Storing cleaned tuna
- Bloodline removal tuna
- Tuna fillet techniques
- Tuna cleaning tools
- How to cut tuna
- Cleaning tuna for sushi
- Cleaning tuna for sashimi
- Cleaning fresh tuna
- Tuna handling after cleaning
- Skinning tuna techniques
- Proper tuna cleaning
- Tuna fillet mistakes
- Preparing tuna meat
- Tuna cleaning guide 2024
 Fishing Fillet Knife – 9 inch
 Fishing Pliers and Knife Combo
 Fillet Knife and Bait Knife
